Tuesday 27 November 2012

Our Garbage Man has Un-trained the Dog.

When we moved here from the stix, one of our concerns was with the dog (stupidest animal known to man) running out into the street. We keep her in the backyard, or in the house, and have established the 'thou shalt not cross line' at the threshold of the front door. We thought we had everything covered off.

Every morning, Chuck takes the dog for a walk. Okay, lets be honest, 3 out of 7 days a week, Chuck remembers to take the dog for a morning walk.

One day out of 7, the garbage man comes by.

Until recently, Chuck had regularly missed taking the dog for a walk on garbage day. Not intentionally, but for whatever reason. The dog was doing OK and the garbage was being taken. All was well. At some point in all this three things happened in the same day.
  1. Chuck Remembered to take the dog for a walk.
  2. The Garbage was collected at the curb.
  3. For whatever reason, the garbage man started setting down the garbage cans upside down.
Now to you and I the goo and waste that falls out of an upside-down garbage can is not very exciting, but to the dog, that stuff is perfectly divine. She has learned that at the bottom of our driveway (and there neighbours) there is sometimes a tasty treat waiting. If the door is opened and a truck can be heard, the dog is out like a shot, runs into the street and sniffs around for whatever will be most expensive for a vet to remove from her gut.

Thanks garbage guy. I owe you one.

Monday 26 November 2012

My Emails are Getting Shorter...

OK, at the risk of this blog becoming a forum for its author's whining (so many are) I have to say my online exchanges have become remarkably short considering the amount of new communication electronica that has entered my life.

Both SWMBO and I now have tablet PCs. Work gave me a Blackberry. SWMBO has a smartphone. Chuck has become a textaholic. We now have more modes of communication floating around the house than we ever have before, and yet, I feel less inclined to communicate electronically than ever before. The reason is that the technology really doesn't help communicate at all. In fact, it gets in the way of it.

A recent exchange between SWMBO and I on facebook chat went like this:

"You downstairs?"
"Yup"
"Bring up a Sprite when you come up?"
"OK"

Here we are in the 20-teens, and the best use we have for our great technology is to not have to yell down the stairs for a can of soda. Pathetic.

The trouble with communicating via tablet PC is the tablet. Typing on a tablet is akin to smearing finger paint on the front window to invite the neighbours over for tea. You jab and point and swipe in a most painful manner, only to realize when you are done that half the words autocorrected to something you didn't mean at all, and the other half either should have caps, but don't, or are spelled entirely wrong. But the tablet does have a wonderful interface to move photos from memory into a blog post or email, something our laptop cannot do nearly as neatly(unless I want to cart it around to take photos).

Which brings me to trying to put together a blog post on a tablet PC. You cannot format a blogpost on a tablet. OK maybe you can, but I don't have those super-powers. I mean my pudgy fingers can barely pick out a hotlink let along format, align, highlite, etc. So on weekends I find myself thinking about great blogposts, and promptly dismissing the ideas. Too much work.

If I do get all inspired to post something, I'll take the photos with the tablet, and import them to blogger, then go to the laptop to type and format, and then post from a PC where I can edit with a reasonable expectation of accuracy. 3 devices, one post. Much pain.

Gmail has now become unstable on most of my devices. I mean, it may be user error or whatever, but between constant hounding to upgrade my browser to Chrome, the new pop-up message box, and wanting a cell number to link my account to, I can barely get an email out. If that stuff comes up while I'm on the tablet, I'm screwed. My emails are now condensed to one or two sentences with the grammer and writing quality of a 2 year old while I dodge pop-ups and error messages. If I go to write an email and that stupid new compose box comes up on the side of the screen, I just shut off the tablet and don't bother. I'd rather call you than deal with the headache of emailing. My tablet won't even show the full text box, so I wouldn't know what I was emailing you anyways.

Of course I tried to find a 'user feedback' spot on Google's website, but I guess they get too much fan mail, and so don't offer a spot to let you send a message. If i did, I know it would be filed under 'Junk' which is OK, because at least one more whiny email added to the piles of whiney emails would at least help get the message across that their platform ain't all that and a bag of chips. Although it still beats a number of the alternatives.

The Blackberry is too new to really whine about, but how the heck do people use those tiny keyboards? I know my boss gave it to me for increased productivity, but I can't type on the darn thing, and if I do, it takes for bloody ever to write anything. UGH. I sound old. Maybe I am old. I can't figure out how to text on it at all, but Chuck has one and she fires away at the keyboard on it like a sniper picking off gophers.

I wonder what kind of user feedback was given when we went from writing on cave walls to clay tablets. Bet I woulda been the guy complaining in teh back row then too. Anyway, if you are waiting for an email from me, keep waiting. It may come soon. Or not.

(As if to prove my point, Blogger's spell check is refusing to work now. I guess I'll have to spell check this later.)

Thursday 22 November 2012

Bye bye Washer, we'll miss you (but not much).

Last night when I got home from work, I put 2 new ball valves in the laundry room. As I worked (and tried not to burn the house down with the soldering torch), it occurred to me that the 50 square feet of laundry room are probably the most worked on space in the house so far. I mean 2 days of dryer venting, and now a night of washer hookup repair. Small spaces mean much work.

In any case, after only a little swearing and much fiddling, I managed to get the laundry hookups right and not leaking, and that meant I could turn on the water to the house again, which also meant Chuck could cook dinner and AP2 could take a shower. You'd think I would be called a hero, but that is not the way a Dad's life goes. Oh well. We don't do these things for glory.

Today I spent my lunch taking the washing machine to the appliance repair place in town where I was given the anticipated news that I was in the market for a new washer. To repair this one would cost over $300 in parts, and then another $200-$300 in labour. Apparently it had thrown a bearing and was no long sitting properly on its spindle. Or something.

I bought a 'newly refurbished' high efficiency/high capacity machine for $400, and will take delivery of it tomorrow. I am sure I could have gotten a used washer cheaper through local classifieds, but this one came with a one year warranty, and they will deliver and set up. That makes me happy. By this time tomorrow, everyone should have clean clothes again.

Wednesday 21 November 2012

The washer blew up.

Since I am done fixing trees in the backyard, its time for things to start breaking inside the house.

The other day while SWMBO and I were lying in bed the sound from our washing machine switched from "whump-whump-whump" to "CLANG-CLANG-RATTLE-BANG-BANG" and it sounded like something not good was happening.

SWMBO mentioned that it had made that noise once before.

I descended to the laundry room and looked at the washer. It was moving like a hula-girl on a trucker's dashboard (Note to self: get hula girl for the Thunder-Buggy, that would add to its tacky coolness). The bounces weren't too high of the floor though, and the clothes were getting clean. I looked through the glass door and saw that the drum was spinning a few inches out of concentricity.

Today I called the local appliance place and they suggested a repair would likely be in the order of $400. A used washer could be had for less. With 4 adults and 2 kids in the house, i don't have much time to negotiate. I said I'd bring in our washer tonight to get an opinion on its condition.

All of this meant that at lunch I found myself crawling under the laundry sink trying to turn off the water supply to the washer. I hate the guy who put those valves in. It is impossible to reach the valves, and even harder to turn them on/off. In the end I found myself standing in the laundry room dripping while a geyser of water washed down the walls and floor around me. A quick run to the basement and I had the water supply shut off for the house. Tonight I'll be putting some ball valves in, I think.

The washer is now sitting beside the house waiting to be loaded up and taken to the appliance repair place downtown. Here's hoping we can get doing laundry again without a lot of delay.


Thursday 15 November 2012

Tree Tying

I know, tying trees to a trellis doesn't sound like much fun, but hey, my life is slow so I don't have much to write about right now. Here is the tree tying post... Which naturally follows the tree planting post, and trellis making posts.


A couple years back we bought some curtains at a church bazaar. The curtains were made of cotton and were huge. We never ended up using them, and they have sat in the basement ever since. The curtains are about to become plant ties.


Meet the curtains...


The curtains were torn into 2" wide strips and the strips cut into foot long pieces (or so) to become plant ties.

My first step in tying the trees was to tie the top of the tree to the highest wire it reached, trying to align the centre stem with the X formed by the bamboo trellis. Since I will be removing the tops of the trees in the spring pruning, I didn't need to be gentle while doing this.


Next I tied the bottom of the trees to the lowest wire, below the trellis. here I did need to be gentle. In order to hold everything in place and be sure the main stem wasn't damaged, I made a round turn on the wire...

Then I twisted the 2 ends of the strip of cotton around each other to form a sort of stand-off to hold the tree away from the wire, but firmly in place. This also constricted the round turn onto the wire, preventing it from slipping side-to-side.

And finally a bunch of half hitches formed a sort of reef knot/granny knot smack down. The end result being a tree held firmly in place.


With the trunk in place, I could turn my attention to the branches where applicable, and tie them off to the bamboo to get them started growing where they belong.

After a couple hours, I had a bunch of white cloth tied to trees on the wires along the back yard. Yippee. Now I just monitor the situation until spring.


UPDATE: While th ecloth ties worked fine and did not damage the trees, they also were very difficult to remove when it was time to retie everything. I have now switched to using velcro straps to tie the trees back on the frame, and it seems to work much better!


Bird...what cereal?

Buddy: "Mommy, guess what!!  We opened da Bird-poop cereal today!!"
Mama: "you...  what?"
Buddy: "Opened Da BIRD POOP Cereal!!"
Mama: "um.... what is bird poop cereal?"
Buddy: "The one with the duck on it"
Mama: "You mean these ones?" (holding up the box of fruit loops)
Buddy: "YUP!"
Mama: "and... what makes it bird poop cereal?"
Buddy: "Da Bird makes da poop, and da man comes & pick it up and puts it in da box, and it's bird poop cereal!"

Tuesday 13 November 2012

Planting Day!!!


After a week of intense bambooing (new word there) I finally had a lattice running the width of the backyard and it was time to think about getting trees in the ground. The trees came to us from the nursery wrapped in plastic. This ranks up there with Christmas morning for excitement.

The package (details on the tree varieties are here)


Peeling back the plastic revealed my bundle of trees. I like anticipation. I like the look of a garden unplanted, I like spring when there is excitement a-twitter with the possibilities of the coming summer. I like a bundle of trees waiting to be planted. The nursery had wrapped the roots in black plastic to retain moisture, and put orange twine around the whole bundle to keep things together neatly.


A pair of snips too care of the twine, and I was able to separate my one bundle into three. Each labelled with the types of trees we had ordered. For the record - Canada Red, Cole's Quince, and Golden Russet.


Planting the trees was a little trickier than I had anticipated. When you plant a grafted plant like fruit trees, roses, etc. You need to be careful to keep the graft above the soil by a couple inches. The graft is usually a nub close to the ground. It is where the plant is connected to its roots - which are usually of another plant. If you bury the graft it is susceptible to disease. Plant too high, and you may get suckers from the root stock competing with your plant. This alone is not a problem. 

When espaliering, you want to plant the plant so that buds align with your framework - in my case, the latticework. The plan with Espalier is that you will cut back the tree after planting such that the buds closest to the frame will be allowed to grow. For my pattern, I will be cutting back the central leader of the trees to the lowest X in the lattice. This alone is also not a problem.

The planting challenge for me was getting the graft above grade just right AND  a set of buds aligned to the lattice just right. There were 2 trees where things actually aligned just right for me.


The rest of the trees posed more of a challenge. Some of the trees had 1 branch that aligned with the frame. I am not sure if that is a good thing or not.  Some had none, but showed promising buds along the trunk. Some I was forced to just plant and hope for the best.


Planting all the trees went surprisingly quickly. In under 2 hours I had everything in the ground. Mother nature was even cooperative, and rained a gentle rain when I was finished. With all the trees in the ground, and watered in, all that was left to do was tying the trees to the framework, and then watch them grow. I left the trees overnight to get comfortable with how they were planted, and did the tying the next day.


The view, post-planting.

Follow along - tree tying!

Friday 9 November 2012

An Introduction to the Trees

When I decided to start this project, I had a hard time sourcing trees that would be sold when tiny. It seems that most nurseries want to ship trees that are ready to bear fruit the year after they are planted. It took a lot of work to find someone selling young trees that could be trained. When I found Siloam Orchards, I basically told them to ship me whatever trees would work best, and trusted their judgement.

http://www.siloamorchards.com/


I drove past their driveway twice while looking for this sign - Its not out at the road.

They suggested 3 varieties of trees - Canada Red, Cole's Quince, and Golden Russet apples. The reasoning for these types is that:

1) I need different varieties to encourage cross pollination.
2) I need apples for baking, eating, and storing.
3) I need trees that are hardy in a Canadian winter.
4) I need apples that are distinctly different so I can identify them at harvest time.

Here is your introduction to my apples... Shamelessly stolen from Siloam's website. I hope they bloom close to concurrently so the cross-pollination thing works. Fingers crossed.

Canada Red

CANADA  RED   The fruit is medium to large in size, mostly uniform.  An apple of disputed heritage, likely first grown in New England and brought from Toronto, Ontario into western New York state where it was raised commercially as Canada Red. Described as being of good quality for a mid winter apple in ‘FRUITS OF ONTARIO, 1906’.  Skin is yellow background covered with deep red blush and darker red striping. Flesh is whitish with green or yellow tinting, firm, crisp, juicy an fine grained. Late fall harvest. 

 Another apple website has an even better description with a picture. Here's a link: Adam's Apples - Canada Red

So it looks like the Canada red could be a Rousseau - or not. It doesn't really matter to me, I just want nice red apples. Also, some sites I read said that this variety is prone to crop failure if the soil isn't right and the weather is wrong. Sounds like it could be a little finicky. All I can do is cross my fingers and hope for the best at this point.

Cole's Quince

COLE’S QUINCE  From Cornish, Maine , as early as 1806.  Also known as Pear Apple or Quince Apple due to its high quince or pear flavor and aroma. Raised by Captain Henry Cole, and described by his son S.W. Cole in his text “American Fruit Book”, in 1849. A summer apple ripening in August, used for culinary purposes when ripening and dessert when fully tree ripened. Yellow skin that may have a sunny side red flush, yellowish white flesh that is mildly acidic, crisp, tender, juicy. Small to medium size, somewhat flat and ribbed. 

Here is another description with a picture from a seller in the US. I have no affiliation with them. I just found this as an early hit on google. Cole's Quince at Fedco Seeds

Cole's Quince looks cool because its an apple that tastes kind of like a pear, except that it tastes like an apple. I love weird stuff, so it fits nicely. I hope they are tasty.

Golden Russet

GOLDEN  RUSSET  RUSSET VARIETY      The most famous of the russets; when most speak of russets they mean this one and are often unaware of the others in the large russet family. This is of American origin, a seedling of English Russet, known in the 1800’s and likely earlier, possibly originating in Burlington County, New Jersey in the 1700’s. One of the latest to fully tree ripen in October, notable for its storage ability. It can keep all winter in cold storage. It may shrivel in storage yet retain good flavor. The mistake is often made in harvesting Golden Russet too early; it must be left to hang on the tree almost as late as possible, and provided with humidity in storage to prevent breakdown and shriveling. Excellent for eating and prized as a cider variety, known to produce a hard cider of up to 7% alcohol due to its high sugar content (hic!); also good for drying. The skin is the typical russet, a  greenish yellow background with a covering of bronze / copper/ orange coloring. The flesh is fine grained, crisp and sugary. Some resistance to apple scab.

The Nova Scotia Apples website has some good info on the Golden Russet here: NS Apples - Golden Russet

My Dad used to buy Russet apples whenever he saw them, almost like they were a delicacy or something. Lately I haven't seen them in stores, which is too bad. Their leathery skin and sharp taste were part of autumn for me as a kid. I think its funny that almost every website I have found them on lists them as a good choice for making strong cider. Hmmmm. Maybe a distillery can be incorporated into the espalier plans.

Once the plants are planted, more photos will follow.

Wednesday 7 November 2012

Espalier - Site Prep Part 2 - Bamboo

A sketch of a Belgian Fence Espalier

If you have been following along, this post picks up where the last post left off. With wire in place, the next step of getting things ready for the trees was to build a growing frame of bamboo. I have enough trees to plant across the backyard on 3 foot centres. I know that is tight, but using dwarf rootstock, and training the trees results in smaller root structures. Besides, the Internet says it will work. Who am I to question the Internet. Based on my 3 foot centres, I needed to set up bamboo with a pole every 3 feet. Since I wanted to make a "Belgian Fence" pattern (image below) I needed to set the bamboo on a diagonal, in both directions to get the fence going.

 First Attempt

My first try was in the dark, right after I got the wires set. I was tired and cold, and I thought it looked pretty good. I stopped until morning when I figured I could carry on with the bamboo. I was lucky I did.
 There is nothing wrong with the pattern or geometry, but if I had continued with the bamboo set like this, I would have ended up with stems coming up 3 feet off the ground before beginning to be formed in to the weave to make the pattern. With only 2 crosses per plant, the fence would be weak, and the ground clearance would be much higher than I was aiming for. I took down 2 of the poles and set out for a second attempt.

In order to fasten the bamboo to the wires, I am using plastic zip ties. They are flexible enough to allow some adjustment after placement, but strong enough to hold everything in place. Once the whole setup is in place, I may lash together the bamboo crosses with some jute twine, and cover the zip ties with more of the same.

Second Time's the Charm

In order to bring things closer to the ground, I re-set 2 parallel stakes, shifting them sideways until my lowest crossing was just above the lowest wire. The first pic below is before re-setting. Further down in this post you can see the difference once I reset things....

The lowest X's are now about 20" above grade. This made the weave tighter, and stronger. It also meant the tips would cross just below the top of the fence. Having that extra cross in each pole made a big difference. See third pic below...

Keeping things lined up

I keep telling myself that this project isn't rocket science, and doesn't require absolute precision. Working with bamboo, or any natural material means there will be some variation from piece to piece, and within the pieces themselves. But still, it is important to keep things square and level. To that end my most important tools on this portion of the job are a roofing square, tape measure, and pliers.

The roofing square allows me to check that each stake is set at 45° to the wires. This keeps each piece of bamboo parallel (or mostly parallel) to the next one.  What I have been doing is setting the zip ties on the bamboo loosely, getting the spacing about right with my tape, and then tightening. Once tight, I use the square to check that the stake is at 45° and then whack it into square with whatever is handy. Once it is square and properly spaced, I use the pliers to tension the zip tie as much as possible.

As a final check, I place the 90° corner of the square at the X formed by the poles and verify that they are square to each other. A couple more whacks and things are usually set.

Bear in mind that perfect is the enemy of good, and as the fence that this is anchored to moves, as the trees grow, as the wire looses tension, as the bamboo weathers, the whole frame will move. 

Pattern Making

With the first five pieces of bamboo in place, the pattern begins to present itself... It takes about 15 minutes per pole to set the bamboo. Thanks to daylight savings time setting in, I only have about 1-1/2 to 2 hours per night to work on this. I managed to sneak out for long enough to set another three poles after breakfast this morning.
And by the time I left for work, this is what the fence looked like. I only have another 9 poles in my bundle of 25. I'm not sure if that will be enough or not. Maybe my math is off on all this. (13 trees, 2 poles per tree = 26 poles??)


Not too shabby looking for a first attempt at this sort of thing, and no major screw ups yet. With any luck I can get out there for another half hour at lunch, and again tonight and get some more set. Maybe I'll even get SWMBO or Chuck out there planting trees tonight!

Meet the trees here, or skip ahead to planting day here.

Tuesday 6 November 2012

Oh Christmas tree....

Buddy says: 'i need to check and see if our Christmas tree gotted dead.... nope, it didn't!  Mommy, our Christmas Tree didn't getted dead!'

Oh good.  Cause if our fake tree died.... I'd be worried!

Espalier - Site Prep Part 1 - Wire


As I said a few days ago, our apple trees have arrived for planting in our espalier. Now that they have sat out for a few days, the pressure is on to get them into the ground.

Being a manly man, I figured that I could do this in a day. Then I slept in. Then I had to go buy hardware. Then I had to go to the Rogers store for a cell phone and spent half a day standing in line. etc. In any case, it took me 2days to get a wire frame up that I will eventually attach bamboo growing frames to. Here is how I built the wire frame.

Step 1: Block and Roll!!


The first part of the project was building blocks to attach to the fence. These blocks will act as a stand-off to hold the espalier off the fence and allow even growth and airflow. Using my trusty compound mitre saw, I cut 2 blocks for each wire on each fencepost. Since this espalier will span 50 feet, I needed a lot of blocks. Eventually, Chuck would come outside and cut some blocks for me, but to get started I cut a bunch myself. For the records, each block is 8" long and cut from pressure treated 2X4's.

Step 2: Screw It!


The blocks are attached to the fence with 2 5/8" X 6" lag bolts. I predrilled the blocks with a 1/4" drill while holding them in place. For this first block, I picked a fencepost at about the middle of the backyard, and judged about where I would want the wires to go to get a decent support up off the ground, but not too high. I marked the middle of the block as where I wanted a wire to go, and then measured up for the next wire at 16". Web sites I read on setting up an espalier suggested anything between 12" to 24" spacing on the wires, so I guessed that 16" would work for us. Only time will tell.


The vertical component is now in place. Three blocks on one post sets up the layout for the rest of the fence.

Step 3: Now you're stringing me a line!


Using my lowest block as a guide, I stretched a string for the length of the fence as long as I could, then set a screw in the fence and tied the string off on it. It is important to use a lightweight line here, and to pull it tight enough that there is no sag in the string. Then, using a long level (longer is better) check if the string is straight. In our yard, some fence posts had settled, and some had leaned in or out, so just measuring down from the top of a fence post would not have given a straight line. Similarly, the ground is uneven, so you would not get a level line measuring up from the ground. Take your time and really make sure that this line is straight. In my case, I was able to get the line straight, but I did not compensate for lean in the fence.


I can almost guarantee that the line will not be level on your first attempt, but you will have a good guess of how far off it is. If you have a helper, it will really speed this step up. Have them hold the level while you move the string up and down to get a closer estimate of where level is for your second attempt. then set the line and try again. It took three tries before I got the string level.

Step 4: New Blocks on the Block


Once the string is set, don't touch it! Eventually you will need to put a block exactly where the screw holding the string is, but for now, just do all the blocks between the string and your first block. As i said before, each block gets 2 lag screws. In addition, you will need to set an eyebolt between the screws. Predrill everything to avoid the wood splitting. The eyebolts will need to go exactly in line with the string line. In the photo above you can see that I have 2 string lines going, and have started setting blocks between them. Since the middle row was done when I took this pic, I have removed its string line.

Step 5: Pulling a wire


With all the blocks and eyebolts in place, its time to set the wires that will make the frame for the espalier's forms to be built on. While your daughter and au pair are watching a movie, bring them a spool of wire and about 2 dozen turnbuckles. Your daughter will be able to twist the wire on to the turnbuckles and the au pair can extend the turnbuckles to their maximum length.

Back outside, attach each wire to an eyebolt and tighten (shorten) the turnbuckles to tension the wires. You need the wires tight enough to give a good "thwongggggg" when you pluck them. If you over tighten the wires, they will break. About halfway through this stage, I ran out of wire and had to get more. The new stuff I got was coated in green plastic, and blends into the fence much more nicely than the steel wire you see here.  Eventually the trees will not need these wires, but your installation has to be good enough to last the first 5 years or so.

I don't have a pic, but I repeated these wires for each section of fence until I had 3 parallel wires running all the way across the backyard. With the wires in place, and the weekend done, it is now time to begin setting the bamboo forms in place. I'll save that for Site prep Part 2.

Monday 5 November 2012

The Cuteness!

Dryer vent relocate

Our house came with the appliances included, and when we moved in, we didn't give them much thought. That was a good thing. Unfortunately the appliances also came with some issues. Not deal-breaker issues, but small things that needed fixing. The fridge (side-by-side with a under mount freezer) left a puddle on the kitchen floor overnight, which was cleared up with a $85 service call that involved dismantling the inside of the appliance to get at a clogged drain nipple.

The laundry room had a bit of a different issue. I am not clear on the how and why of it, but for some reason, the previous owners had decided that relocating the laundry vent from an exterior wall to the garage was a good idea. The end result of this was that the lint and moisture from the dryer was all over everything in the garage. Making things worse, it was impossible to line up the dryer venting on the outlet to the garage, resulting in the dryer venting to the laundry room instead of anything close to outside.

After some thought the reason for the change became clear. The dryer was a rear-vent unit. The hole in the wall was beside the dryer. Due to space constraints, the vent line for the dryer would not fit to the side wall unless you took the time to convert the dryer to a side vent unit. I assume that the previous owner either didn't know how to do that, or didn't know it was possible. Or he saw the price of a conversion kit for the dryer (I think its a Whirlpool) and had a heart attack.

These sorts of mechanical details drive me crazy, so I spent a weekend relocating the vent and converting the dryer from a rear-vent to a side vent machine. Here's the play-by play...

In the photo above, you get an idea of the "before scenario. The hole in the wall next to the screwdriver is where I need the dryer vent to end up. The hole next to the shopping bags goes out to the garage. Note the lint build-up in the corner. The plug is still in the wall here. All I have done in the pic is pulled out the dryer and removed the drywall patch over the "right hole" to make sure everything is intact in there... it isn't.


This is the back of the dryer. I have removed the access plate that lets you get a good look at what is inside. The vent pipe is held on by one screw (red Robertson) and comes out with a pull. There is a rubber gasket that seals the pipe to the inside of the dryer. It's like a big rubber band.


Appliance parts places wanted $90 for a rear vent to side vent conversion kit. That's a little pricey for me. Instead, I bought an elbow and piece of straight pipe at Home Hardware (my favourite hardware store) and then measured and cut everything to size to go from the existing dryer vent location to the side vent knockout on the side of the dryer. The tab where the red Robertson screw was holding the dryer vent in place before is now a stand-off to keep the vent from sagging to the floor of the dryer. I thought briefly about building up a block of aluminium foil to act as a second standoff past the elbow, but decided that would be redundant.

You can see in this photo that I am using tin foil tape to hold everything together. Duct tape is not only flammable, it also doesn't stick well in a high heat application. Foil tape is more expensive, but is also stronger, provides a better seal, and is safer for this. You will see everything smothered in foil tape by the time I am done here.


With the elbow in place, its time for a test-fit. You can see the rubber-band style gasket where the pipe meets the machine.


And here is the pipe exiting the dryer... so far so good! We have converted the dryer to side venting. So far our total investment is about $10. Not too bad, but things are about to get more difficult.


With the dryer set to go, its time to take a closer look at the hole in the wall. Inside the house, the previous owner had folded the vent in on itself (with a hammer) and filled the pipe with expanding foam before filling the whole thing with a clod of drywall mud. While this technique led to a minimal issue with drafts, it meant that reverting to a properly vented dryer would have to begin with removing the old pipe and replacing it with new.


Outside, there was a buildup of about 3/4 of an inch of caulk, and then the expanding foam plug. I had pulled off the vent cover earlier. Before doing anything I would need to clean up the brick face, remove the foam, and get the old vent pipe out. Using a drywall saw I cut the foam plug up like slices of pie. I had taken the first section out in the photo above. I have a really aggressive drywall saw from Stanley tools that really works well for this stuff, but it tears drywall paper rather than cutting it. Anyway, The plug came out, and the caulking peeled away from the wall with surprising ease.


Getting the pipe out was more difficult. the aluminium gripped the brick when I tried to pull it out, and creases in the pipe from previous bashing caught on the drywall if I tried to pull it in. Eventually, I got it out without damaging anything.


Looks like I'll need to do some drywall patching next time we decorate the laundry room.


With the pipe out, I set to work with an air chisel to clean off high spots on the face of the brick. This would make it easier to seat the new dryer vent without having to deal with the irregularities of the brick face. 10 minutes with the air chisel was the difference between 3/4 of an inch of caulking and a nice little bead of caulking.


It still took a lot of caulking to get everything seated. I buttered the back of the faceplate for the vent, and then filled all the masonry joints before sliding the new vent into the wall. Then I ran a bead of caulking around the outside of the vent and smoothed it out. In the end I used more than a full tube of caulk for this, which was likely overkill. I am sure much of the caulk on the back of the vent never touched masonry. In the picture above, I have leaned "heavy stuff" on the new vent to keep the caulking seated while it hardens.


With the dryer converted, and the vent in place, it was time to
build the connector pipe. Normally, I like to use round, solid dryer vent as much as possible, and try not to use the plastic accordion vent. I don't much care for the steel expanding vent either. In this case though, I needed something to fit a tight space, and I needed to be able to make it have a custom length. The distance from the side of the dryer to the wall was only about 3" and the distance from the dryer outlet to where it would connect to the exterior vent was only 6". At your local Home Hardware (or big box) you can buy what is called a "Spacesaver Expanding Vent" or a "Periscope Vent" for your dryer. Around here the periscope vent sells for about $30.

These vents are designed to be a riser from your dryer vent to a wall outlet above the dryer. They work great in basements and tight spaces. Since they are made of thin aluminium, you can cut them down if they are too small, but they will also expand to a height of about 4 feet if you need to open them up. In the photo above, I have cut down one side of the vent. In my application, the vent will be very short, and will run horizontally. I will need to cut down both sides of the vent, and reassemble them to bring the pipe forward along the side of the dryer


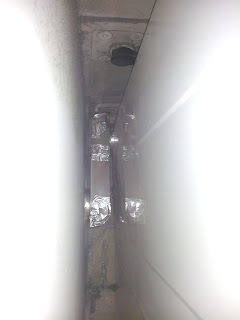
Et voila! More foil tape, and it is not a work of art, but it will vent to where I need it to, and everything works fine. Below you can see a shot of the vent in place, snugged in between the dryer and the wall in the space where the PO couldn't get the dryer to vent to.


Now that we can do laundry, I need to turn my attention back to the gardens and get those apple trees started! Oh, and replace the laundry room door that warped from all the moisture in there.

Friday 2 November 2012

The Beginning of the Espalier...

The trees are here! The trees are here!

So one of our summer projects was cleaning out the defunct strip garden between the pool and fence across the back of our yard. That garden is a mere 24" - 36" wide and presents a difficult puzzle as far as planting goes. Were I to plant any of my regular choices in there, it would either be overcrowded or short. I would spend the rest of my days looking at a shadow-box fence which lacks character and beauty. If I plant anything tall, it will quickly shrub out over the pool.

The previous owner had gone for tall and skinny with Rocket Junipers, but they require trimming maintenance - something I recall from my childhood days as being not much fun, and involving picking up prickles in burlap bags. I also recall my sister's severed finger when the hedge trimmer got away from her one time. The hospital people reattached it.

We cut the junipers off at the base and dug out the stumps this summer.

My design solution is to plant a row of espalier apple trees along the fence. Now I know, I just got finished saying I didn't want the maintenance headache that comes with trimming trees, but an espalier you only prune 3 times per summer, and it grows apples. That way beats trimming junipers twice a month and getting nothing back.

I ordered 13 apple tree starts back in the fall from a nearby grower of heritage Apple trees. Siloam Orchards ships trees all over the place and has some pretty cool trees. Being a local independant orchard, they are able to take custom orders small or large, and can offer real-live people to help over the phone.

This week they called to tell me the trees were ready for pickup, and on Wednesday, I went to get my trees. The folks at Siloam had wrapped the trees in a nice bundle so I wouldn't get the car dirty (I went in my new "monster truck") and the bundle is now sitting behind the house, ready for planting.

This weekend we need to finish some site prep, set up trellis lines on the fence, and plant the trees. I am facing a challenge with locating bamboo poles at this time of year.

We'll figure it out. Watch for updates soon.

Forward to Espalier Site Prep Part 1

Class Photo

Buddy brought home his first class photo yesterday.:

Daddy: "Oh Look!!  It's Your picture of your class!"
Buddy: "No No No Daddy... it isn't my class!"
Daddy: "It isn't?"
Buddy: "No."
Daddy: "Whose class is it then?"
Buddy: "It's just in the gym daddy, not in my class!"

Thursday 1 November 2012

Haloween 2012

My Monkey & my Skunk-ey!
Cuppa the Monkey

Buddy the skunk-ey!


"Plea un-oor Mommy, plea-un orr?"

The haul!

Ready to GO DAD!!


Pumpkins!