Thursday, 15 November 2012

Tree Tying

I know, tying trees to a trellis doesn't sound like much fun, but hey, my life is slow so I don't have much to write about right now. Here is the tree tying post... Which naturally follows the tree planting post, and trellis making posts.


A couple years back we bought some curtains at a church bazaar. The curtains were made of cotton and were huge. We never ended up using them, and they have sat in the basement ever since. The curtains are about to become plant ties.


Meet the curtains...


The curtains were torn into 2" wide strips and the strips cut into foot long pieces (or so) to become plant ties.

My first step in tying the trees was to tie the top of the tree to the highest wire it reached, trying to align the centre stem with the X formed by the bamboo trellis. Since I will be removing the tops of the trees in the spring pruning, I didn't need to be gentle while doing this.


Next I tied the bottom of the trees to the lowest wire, below the trellis. here I did need to be gentle. In order to hold everything in place and be sure the main stem wasn't damaged, I made a round turn on the wire...

Then I twisted the 2 ends of the strip of cotton around each other to form a sort of stand-off to hold the tree away from the wire, but firmly in place. This also constricted the round turn onto the wire, preventing it from slipping side-to-side.

And finally a bunch of half hitches formed a sort of reef knot/granny knot smack down. The end result being a tree held firmly in place.


With the trunk in place, I could turn my attention to the branches where applicable, and tie them off to the bamboo to get them started growing where they belong.

After a couple hours, I had a bunch of white cloth tied to trees on the wires along the back yard. Yippee. Now I just monitor the situation until spring.


UPDATE: While th ecloth ties worked fine and did not damage the trees, they also were very difficult to remove when it was time to retie everything. I have now switched to using velcro straps to tie the trees back on the frame, and it seems to work much better!


Bird...what cereal?

Buddy: "Mommy, guess what!!  We opened da Bird-poop cereal today!!"
Mama: "you...  what?"
Buddy: "Opened Da BIRD POOP Cereal!!"
Mama: "um.... what is bird poop cereal?"
Buddy: "The one with the duck on it"
Mama: "You mean these ones?" (holding up the box of fruit loops)
Buddy: "YUP!"
Mama: "and... what makes it bird poop cereal?"
Buddy: "Da Bird makes da poop, and da man comes & pick it up and puts it in da box, and it's bird poop cereal!"

Tuesday, 13 November 2012

Planting Day!!!


After a week of intense bambooing (new word there) I finally had a lattice running the width of the backyard and it was time to think about getting trees in the ground. The trees came to us from the nursery wrapped in plastic. This ranks up there with Christmas morning for excitement.

The package (details on the tree varieties are here)


Peeling back the plastic revealed my bundle of trees. I like anticipation. I like the look of a garden unplanted, I like spring when there is excitement a-twitter with the possibilities of the coming summer. I like a bundle of trees waiting to be planted. The nursery had wrapped the roots in black plastic to retain moisture, and put orange twine around the whole bundle to keep things together neatly.


A pair of snips too care of the twine, and I was able to separate my one bundle into three. Each labelled with the types of trees we had ordered. For the record - Canada Red, Cole's Quince, and Golden Russet.


Planting the trees was a little trickier than I had anticipated. When you plant a grafted plant like fruit trees, roses, etc. You need to be careful to keep the graft above the soil by a couple inches. The graft is usually a nub close to the ground. It is where the plant is connected to its roots - which are usually of another plant. If you bury the graft it is susceptible to disease. Plant too high, and you may get suckers from the root stock competing with your plant. This alone is not a problem. 

When espaliering, you want to plant the plant so that buds align with your framework - in my case, the latticework. The plan with Espalier is that you will cut back the tree after planting such that the buds closest to the frame will be allowed to grow. For my pattern, I will be cutting back the central leader of the trees to the lowest X in the lattice. This alone is also not a problem.

The planting challenge for me was getting the graft above grade just right AND  a set of buds aligned to the lattice just right. There were 2 trees where things actually aligned just right for me.


The rest of the trees posed more of a challenge. Some of the trees had 1 branch that aligned with the frame. I am not sure if that is a good thing or not.  Some had none, but showed promising buds along the trunk. Some I was forced to just plant and hope for the best.


Planting all the trees went surprisingly quickly. In under 2 hours I had everything in the ground. Mother nature was even cooperative, and rained a gentle rain when I was finished. With all the trees in the ground, and watered in, all that was left to do was tying the trees to the framework, and then watch them grow. I left the trees overnight to get comfortable with how they were planted, and did the tying the next day.


The view, post-planting.

Follow along - tree tying!

Friday, 9 November 2012

An Introduction to the Trees

When I decided to start this project, I had a hard time sourcing trees that would be sold when tiny. It seems that most nurseries want to ship trees that are ready to bear fruit the year after they are planted. It took a lot of work to find someone selling young trees that could be trained. When I found Siloam Orchards, I basically told them to ship me whatever trees would work best, and trusted their judgement.

http://www.siloamorchards.com/


I drove past their driveway twice while looking for this sign - Its not out at the road.

They suggested 3 varieties of trees - Canada Red, Cole's Quince, and Golden Russet apples. The reasoning for these types is that:

1) I need different varieties to encourage cross pollination.
2) I need apples for baking, eating, and storing.
3) I need trees that are hardy in a Canadian winter.
4) I need apples that are distinctly different so I can identify them at harvest time.

Here is your introduction to my apples... Shamelessly stolen from Siloam's website. I hope they bloom close to concurrently so the cross-pollination thing works. Fingers crossed.

Canada Red

CANADA  RED   The fruit is medium to large in size, mostly uniform.  An apple of disputed heritage, likely first grown in New England and brought from Toronto, Ontario into western New York state where it was raised commercially as Canada Red. Described as being of good quality for a mid winter apple in ‘FRUITS OF ONTARIO, 1906’.  Skin is yellow background covered with deep red blush and darker red striping. Flesh is whitish with green or yellow tinting, firm, crisp, juicy an fine grained. Late fall harvest. 

 Another apple website has an even better description with a picture. Here's a link: Adam's Apples - Canada Red

So it looks like the Canada red could be a Rousseau - or not. It doesn't really matter to me, I just want nice red apples. Also, some sites I read said that this variety is prone to crop failure if the soil isn't right and the weather is wrong. Sounds like it could be a little finicky. All I can do is cross my fingers and hope for the best at this point.

Cole's Quince

COLE’S QUINCE  From Cornish, Maine , as early as 1806.  Also known as Pear Apple or Quince Apple due to its high quince or pear flavor and aroma. Raised by Captain Henry Cole, and described by his son S.W. Cole in his text “American Fruit Book”, in 1849. A summer apple ripening in August, used for culinary purposes when ripening and dessert when fully tree ripened. Yellow skin that may have a sunny side red flush, yellowish white flesh that is mildly acidic, crisp, tender, juicy. Small to medium size, somewhat flat and ribbed. 

Here is another description with a picture from a seller in the US. I have no affiliation with them. I just found this as an early hit on google. Cole's Quince at Fedco Seeds

Cole's Quince looks cool because its an apple that tastes kind of like a pear, except that it tastes like an apple. I love weird stuff, so it fits nicely. I hope they are tasty.

Golden Russet

GOLDEN  RUSSET  RUSSET VARIETY      The most famous of the russets; when most speak of russets they mean this one and are often unaware of the others in the large russet family. This is of American origin, a seedling of English Russet, known in the 1800’s and likely earlier, possibly originating in Burlington County, New Jersey in the 1700’s. One of the latest to fully tree ripen in October, notable for its storage ability. It can keep all winter in cold storage. It may shrivel in storage yet retain good flavor. The mistake is often made in harvesting Golden Russet too early; it must be left to hang on the tree almost as late as possible, and provided with humidity in storage to prevent breakdown and shriveling. Excellent for eating and prized as a cider variety, known to produce a hard cider of up to 7% alcohol due to its high sugar content (hic!); also good for drying. The skin is the typical russet, a  greenish yellow background with a covering of bronze / copper/ orange coloring. The flesh is fine grained, crisp and sugary. Some resistance to apple scab.

The Nova Scotia Apples website has some good info on the Golden Russet here: NS Apples - Golden Russet

My Dad used to buy Russet apples whenever he saw them, almost like they were a delicacy or something. Lately I haven't seen them in stores, which is too bad. Their leathery skin and sharp taste were part of autumn for me as a kid. I think its funny that almost every website I have found them on lists them as a good choice for making strong cider. Hmmmm. Maybe a distillery can be incorporated into the espalier plans.

Once the plants are planted, more photos will follow.

Wednesday, 7 November 2012

Espalier - Site Prep Part 2 - Bamboo

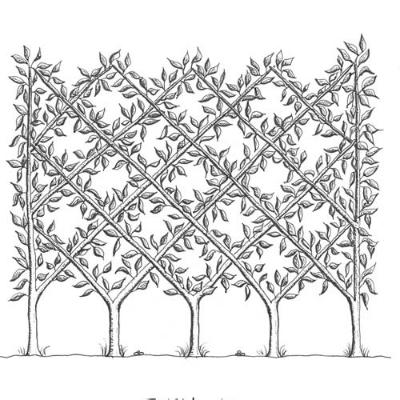
A sketch of a Belgian Fence Espalier

If you have been following along, this post picks up where the last post left off. With wire in place, the next step of getting things ready for the trees was to build a growing frame of bamboo. I have enough trees to plant across the backyard on 3 foot centres. I know that is tight, but using dwarf rootstock, and training the trees results in smaller root structures. Besides, the Internet says it will work. Who am I to question the Internet. Based on my 3 foot centres, I needed to set up bamboo with a pole every 3 feet. Since I wanted to make a "Belgian Fence" pattern (image below) I needed to set the bamboo on a diagonal, in both directions to get the fence going.

 First Attempt

My first try was in the dark, right after I got the wires set. I was tired and cold, and I thought it looked pretty good. I stopped until morning when I figured I could carry on with the bamboo. I was lucky I did.
 There is nothing wrong with the pattern or geometry, but if I had continued with the bamboo set like this, I would have ended up with stems coming up 3 feet off the ground before beginning to be formed in to the weave to make the pattern. With only 2 crosses per plant, the fence would be weak, and the ground clearance would be much higher than I was aiming for. I took down 2 of the poles and set out for a second attempt.

In order to fasten the bamboo to the wires, I am using plastic zip ties. They are flexible enough to allow some adjustment after placement, but strong enough to hold everything in place. Once the whole setup is in place, I may lash together the bamboo crosses with some jute twine, and cover the zip ties with more of the same.

Second Time's the Charm

In order to bring things closer to the ground, I re-set 2 parallel stakes, shifting them sideways until my lowest crossing was just above the lowest wire. The first pic below is before re-setting. Further down in this post you can see the difference once I reset things....

The lowest X's are now about 20" above grade. This made the weave tighter, and stronger. It also meant the tips would cross just below the top of the fence. Having that extra cross in each pole made a big difference. See third pic below...

Keeping things lined up

I keep telling myself that this project isn't rocket science, and doesn't require absolute precision. Working with bamboo, or any natural material means there will be some variation from piece to piece, and within the pieces themselves. But still, it is important to keep things square and level. To that end my most important tools on this portion of the job are a roofing square, tape measure, and pliers.

The roofing square allows me to check that each stake is set at 45° to the wires. This keeps each piece of bamboo parallel (or mostly parallel) to the next one.  What I have been doing is setting the zip ties on the bamboo loosely, getting the spacing about right with my tape, and then tightening. Once tight, I use the square to check that the stake is at 45° and then whack it into square with whatever is handy. Once it is square and properly spaced, I use the pliers to tension the zip tie as much as possible.

As a final check, I place the 90° corner of the square at the X formed by the poles and verify that they are square to each other. A couple more whacks and things are usually set.

Bear in mind that perfect is the enemy of good, and as the fence that this is anchored to moves, as the trees grow, as the wire looses tension, as the bamboo weathers, the whole frame will move. 

Pattern Making

With the first five pieces of bamboo in place, the pattern begins to present itself... It takes about 15 minutes per pole to set the bamboo. Thanks to daylight savings time setting in, I only have about 1-1/2 to 2 hours per night to work on this. I managed to sneak out for long enough to set another three poles after breakfast this morning.
And by the time I left for work, this is what the fence looked like. I only have another 9 poles in my bundle of 25. I'm not sure if that will be enough or not. Maybe my math is off on all this. (13 trees, 2 poles per tree = 26 poles??)


Not too shabby looking for a first attempt at this sort of thing, and no major screw ups yet. With any luck I can get out there for another half hour at lunch, and again tonight and get some more set. Maybe I'll even get SWMBO or Chuck out there planting trees tonight!

Meet the trees here, or skip ahead to planting day here.

Tuesday, 6 November 2012

Oh Christmas tree....

Buddy says: 'i need to check and see if our Christmas tree gotted dead.... nope, it didn't!  Mommy, our Christmas Tree didn't getted dead!'

Oh good.  Cause if our fake tree died.... I'd be worried!

Espalier - Site Prep Part 1 - Wire


As I said a few days ago, our apple trees have arrived for planting in our espalier. Now that they have sat out for a few days, the pressure is on to get them into the ground.

Being a manly man, I figured that I could do this in a day. Then I slept in. Then I had to go buy hardware. Then I had to go to the Rogers store for a cell phone and spent half a day standing in line. etc. In any case, it took me 2days to get a wire frame up that I will eventually attach bamboo growing frames to. Here is how I built the wire frame.

Step 1: Block and Roll!!


The first part of the project was building blocks to attach to the fence. These blocks will act as a stand-off to hold the espalier off the fence and allow even growth and airflow. Using my trusty compound mitre saw, I cut 2 blocks for each wire on each fencepost. Since this espalier will span 50 feet, I needed a lot of blocks. Eventually, Chuck would come outside and cut some blocks for me, but to get started I cut a bunch myself. For the records, each block is 8" long and cut from pressure treated 2X4's.

Step 2: Screw It!


The blocks are attached to the fence with 2 5/8" X 6" lag bolts. I predrilled the blocks with a 1/4" drill while holding them in place. For this first block, I picked a fencepost at about the middle of the backyard, and judged about where I would want the wires to go to get a decent support up off the ground, but not too high. I marked the middle of the block as where I wanted a wire to go, and then measured up for the next wire at 16". Web sites I read on setting up an espalier suggested anything between 12" to 24" spacing on the wires, so I guessed that 16" would work for us. Only time will tell.


The vertical component is now in place. Three blocks on one post sets up the layout for the rest of the fence.

Step 3: Now you're stringing me a line!


Using my lowest block as a guide, I stretched a string for the length of the fence as long as I could, then set a screw in the fence and tied the string off on it. It is important to use a lightweight line here, and to pull it tight enough that there is no sag in the string. Then, using a long level (longer is better) check if the string is straight. In our yard, some fence posts had settled, and some had leaned in or out, so just measuring down from the top of a fence post would not have given a straight line. Similarly, the ground is uneven, so you would not get a level line measuring up from the ground. Take your time and really make sure that this line is straight. In my case, I was able to get the line straight, but I did not compensate for lean in the fence.


I can almost guarantee that the line will not be level on your first attempt, but you will have a good guess of how far off it is. If you have a helper, it will really speed this step up. Have them hold the level while you move the string up and down to get a closer estimate of where level is for your second attempt. then set the line and try again. It took three tries before I got the string level.

Step 4: New Blocks on the Block


Once the string is set, don't touch it! Eventually you will need to put a block exactly where the screw holding the string is, but for now, just do all the blocks between the string and your first block. As i said before, each block gets 2 lag screws. In addition, you will need to set an eyebolt between the screws. Predrill everything to avoid the wood splitting. The eyebolts will need to go exactly in line with the string line. In the photo above you can see that I have 2 string lines going, and have started setting blocks between them. Since the middle row was done when I took this pic, I have removed its string line.

Step 5: Pulling a wire


With all the blocks and eyebolts in place, its time to set the wires that will make the frame for the espalier's forms to be built on. While your daughter and au pair are watching a movie, bring them a spool of wire and about 2 dozen turnbuckles. Your daughter will be able to twist the wire on to the turnbuckles and the au pair can extend the turnbuckles to their maximum length.

Back outside, attach each wire to an eyebolt and tighten (shorten) the turnbuckles to tension the wires. You need the wires tight enough to give a good "thwongggggg" when you pluck them. If you over tighten the wires, they will break. About halfway through this stage, I ran out of wire and had to get more. The new stuff I got was coated in green plastic, and blends into the fence much more nicely than the steel wire you see here.  Eventually the trees will not need these wires, but your installation has to be good enough to last the first 5 years or so.

I don't have a pic, but I repeated these wires for each section of fence until I had 3 parallel wires running all the way across the backyard. With the wires in place, and the weekend done, it is now time to begin setting the bamboo forms in place. I'll save that for Site prep Part 2.